Featured

How to create pipeline in Jenkins

Creating a Jenkins pipeline involves defining a script that specifies the entire build process, including stages, steps, and conditions. Jenkins Pipeline can be created using either Declarative or Scripted syntax. Below, I’ll provide a simple example using both syntaxes.

Declarative Pipeline:

pipeline {
    agent any
    
    stages {
        stage('Build') {
            steps {
                echo 'Building the project'
                // Your build steps go here
            }
        }
        
        stage('Test') {
            steps {
                echo 'Running tests'
                // Your test steps go here
            }
        }
        
        stage('Deploy') {
            steps {
                echo 'Deploying the application'
                // Your deployment steps go here
            }
        }
    }
}

In this example:

  • agent any specifies that the pipeline can run on any available agent.
  • stages define the different phases of the pipeline.
  • Inside each stage, you have steps where you define the tasks to be executed.

Scripted Pipeline:

Scripted pipelines use a more programmatic approach with a Groovy-based DSL. Here’s an example:

node {
    // Define the build stage
    stage('Build') {
        echo 'Building the project'
        // Your build steps go here
    }

    // Define the test stage
    stage('Test') {
        echo 'Running tests'
        // Your test steps go here
    }

    // Define the deploy stage
    stage('Deploy') {
        echo 'Deploying the application'
        // Your deployment steps go here
    }
}

In this example:

  • node specifies that the entire pipeline will run on a single agent.
  • Inside each stage, you have the code for the corresponding tasks.

Pipeline Setup in Jenkins

  1. Install the Docker Pipeline Plugin:
    • Navigate to “Manage Jenkins” > “Manage Plugins” in the Jenkins Classic UI.
    • Switch to the “Available” tab, search for “Docker Pipeline,” and check the box next to it.
    • Click “Install without restart.”
  2. Restart Jenkins:
    • After installing the Docker Pipeline Plugin, restart Jenkins to ensure the plugin is ready for use.
  3. Create a Jenkinsfile in Your Repository:
    • Copy the above script (declarative or scripted) to a file named ‘Jenkinsfile’.
  4. Create a New Multibranch Pipeline in Jenkins:
    • In the Jenkins Classic UI, click on “New Item” in the left column.
    • Provide a name for your new item (e.g., My-Pipeline).
    • Select “Multibranch Pipeline” as the project type.
    • Click “OK.”
  5. Configure Repository Source:
    • Click the “Add Source” button.
    • Choose the type of repository you want to use (e.g., Git, GitHub, Bitbucket) and fill in the required details (repository URL, credentials, etc.).
  6. Save and Run Your Pipeline:
    • Click the “Save” button.
    • Jenkins will automatically detect branches in your repository and start running the pipeline.

This is a very basic example. Depending on your project, you may need to add more advanced features, such as parallel execution, input prompts, error handling, and integration with external tools.

Make sure to refer to the official Jenkins Pipeline documentation for more in-depth information and advanced features.

Featured

How to search from an XML column in SQL

Search from an xml column in sql

<ArticlePage>
  <publishDate><![CDATA[201612151611499007]]></publishDate>
  <category><![CDATA[1000004]]></category>
</ArticlePage>
SELECT *
  FROM [Table_Name]
  where CAST([xml] as XML).value ('(/ArticlePage/category)[1]', 'varchar(max)') like '1000004'
Featured

How to connect to SQL database from Lambda using Nodejs

To connect to SQL database from lambda, I am using Nuget package ‘mssql’.

For this, I have created a serverless application using Nodejs 16.x.

To connect to SQL database from lambda, I am using Nuget package ‘mssql’.

In your serverless application, install mssql like below –

npm install mssql

Usage

I am using Typescript and DBConfig used above is just an interface.
Also replace all the config with your database credentials.

import sql from "mssql";

const config : DBConfig = {
 user: ${process.env.DB_USER},
 password: ${process.env.DB_PASSWORD},
 server: ${process.env.DB_SERVER},
 database: ${process.env.DATABASE},
 options: {
  trustServerCertificate: true,
 },
};

export const run = async () => {
 try {
  await sql.connect(config);
  const result = await sql.query`Select * from [TableName]`;
  var result = result.recordset;
}
catch (err) {
 console.error("Error:", err);
 return {
  statusCode: 500,
  body: JSON.stringify({
  message: "Error accessing the database.",
  error: err,
  }),
 };
}
}

Please note that the RDS and lambda should be in same VPC settings. If while running lambda, you get a timeout error, do verify the VPC settings for both RDS and lambda. If they are in different VPC, then you have to do further settings. Please refer to AWS documentation for that.

Also make sure the IAM role in lambda should have permission to access RDS

Refer to this if you are looking to send an email with attachment from lambda.

Featured

Updating .NET framework

Follow the below steps before updating the .NET framework.

I updated from 4.5.1 to 4.6.2

  • Update all the DLLs or NuGet packages used in the project to the latest version
  • Right click on the solution and select Manage NuGet packages for Solution

  • Update any packages coming under the update tab

  • Consolidate any packages coming under the Consolidate tab. This is to make sure you have the same NuGet package version in all the projects

Once you do the above steps, follow the below steps –

  1. Right click on each of the project and click Properties. Select the .Net framework version from the Target Framework dropdown as below

2. After updating the framework version for each of the project, you need to target each of the package in packages.config to the new framework version. For this, just run the below command in package manager console –

Update-Package -Reinstall
Featured

Convert JSON to csv in C#

Convert JSON to csv in C#

  • Given users.json as the json file
using (var csv = new ChoCSVWriter("users.csv").WithFirstLineHeader())
{
   using (var json = new ChoJSONReader("users.json") 
      .WithField("Username")
      .WithField("Sub", jsonPath: "$.Attributes[?(@.Name == 'sub')].Value", isArray: true)
      .WithField("EmailVerified", jsonPath: "$.Attributes[?(@.Name == 'email_verified')].Value", isArray: true)
      .WithField("GivenName", jsonPath: "$.Attributes[?(@.Name == 'given_name')].Value", isArray: true)
      .WithField("FamilyName", jsonPath: "$.Attributes[?(@.Name == 'family_name')].Value", isArray: true)
      .WithField("Email", jsonPath: "$.Attributes[?(@.Name == 'email')].Value", isArray: true)
      .WithField("UserCreateDate")
      .WithField("UserLastModifiedDate")
      .WithField("Enabled")
      .WithField("UserStatus")
   )
{
   csv.Write(json);
}
}
Featured

Check if the string is valid JSON in C#

C# validate json string

public static bool IsJsonString(string str)
{
     if (string.IsNullOrWhiteSpace(str)) { return false; }
     str = str.Trim();
     if ((str.StartsWith("{") && str.EndsWith("}")) || 
         (str.StartsWith("[") && str.EndsWith("]")))
      {
         try
         {
            var obj = JToken.Parse(str);
            return true;
          }
          catch (JsonReaderException jex)
          {
             return false;
          }
          catch (Exception ex) //some other exception
          {
             return false;
          }
      }
      else
      {
         return false;
      }
 }
Featured

Export Users from Cognito in AWS

Export Cognito Users in AWS

As of today, there is no way to directly export users from Cognito in AWS.

But we can use AWS CLI or AWS SDK to get the list of users.

  • First step is to install AWS CLI on your machine

Click here to download and install AWS CLI

  • Next, step is to configure AWS on your machine. To do this, open cmd (command prompt) and do the following –
$ aws configure
AWS Access Key ID [None]: YourAccessKeyId
AWS Secret Access Key [None]: YourSecretAccessKey
Default region name [None]: YourRegion
Default output format [None]: json

Replace the above with your values. For more info, click here.

  • To get the list of all users in Cognito, run the following command
aws cognito-idp list-users --region <region> --user-pool-id <userPoolId> 
--output json > users.json

The above will return the list of users in a json format. If you want to get the result in a table format, run the following command

aws cognito-idp list-users --region <region> --user-pool-id <userPoolId>  --output table > users.txt
  • Now if you want to convert the result json to csv. Use the following code snippet.
private static void ConvertJsonToCsv()
{
 using (var csv = new ChoCSVWriter("users.csv").WithFirstLineHeader())
 {
   using (var json = new ChoJSONReader("CognitoUsers.json")
             .WithField("Username")
             .WithField("Email", jsonPath: "$.Attributes[?(@.Name == 
              'email')].Value", isArray: true)
             .WithField("UserStatus")
         )
  {
     csv.Write(json);
  }
 }
}

Featured

How to replace space with underscore in an xml file using Notepad++

It is very easy to achieve this using a regex expression. Suppose we have below in an xml file and we want to replace the space inside DisplayName node with underscore.

Sample xml –

<User id="11068577">
	<UserId>11068577</UserId>
	<DisplayName>Dolcese Vita</DisplayName>
	<Address>Texas, US</Address>
</User>
  1. Open Notepad++
  2. Click Ctrl+H to open replace dialog box
  3. Add below in Find What:
(?i)(<DisplayName>.*?)[\s](?=.*</DisplayName>)

4. Add below in Replace with:

\1_\2

5. Result –

<User id="11068577">
	<UserId>11068577</UserId>
	<DisplayName>Dolcese_Vita</DisplayName>
	<Address>Texas, US</Address>
</User>


Interested in Cryptocurrency. Register and start investing here

Earn a side income by affiliate marketing. Learn here how to do it.

Featured

Restore Azure Database (.bacpac) file to SQL Server (.bak) file

Azure Sql Database is a fully managed relational database that provisions quickly, scales on the fly and includes built-in intelligence and security as well.

Azure Sql Database is a fully managed relational database that provisions quickly, scales on the fly and includes built-in intelligence and security as well.

Below are the steps to restore the database from .bacpac (Azure DB backup) file to .bak (SQL DB backup) file

  1. The first step is to export the Azure DB. For this, you need to login to your Azure portal and go to SQL database in your resource group. Click Export as shown below.


  2. After clicking on Export, you have to select the storage location and add the credentials as shown below.
    This process will take few minutes to finish depending on your database size.


    Note: It is good to select the storage location (blob storage) in the same resource group, if you have multiple resource groups


  3. After the export is finished, you will get the exported file as a .bacpac file in your selected storage. (In my case, it is blob storage container)


  4. Right-click on the .bacpac file you just created and download it locally


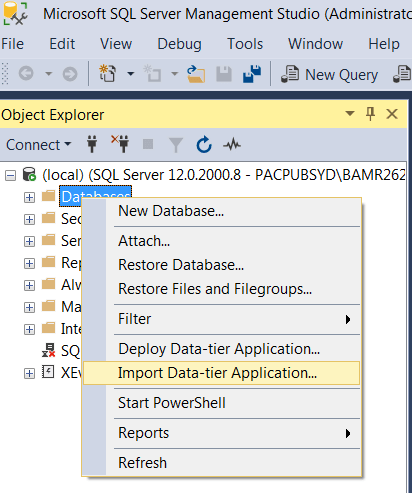
  5. The next step is to create .bak file from the .bacpac file you just downloaded. For this, you need to open SQL Server Management Studio (I am using SQL Server Management Studio v17.9.1).
    Right-click on Databases and select Import Data-tier Application.


    You will see the below screen. Now, click Next.


  6. Click on Browse and select the .bacpac file you downloaded from Azure in the previous step and click Next as shown below –


  7. Here you can change the database name or can keep the same name as your .bacpac file.
    You can leave the other settings as it is and just click Next again.


  8. Now, you can verify all the settings below and click Finish or you can click Previous and go back to the previous settings if you want to change anything.


  9. Now you will see the progress and once it is finished, you will see the below Operation Complete screen. If there is any error, you can click on that and see what is wrong, else you will get all Success


  10. You can see the newly restored database under the Databases folder.


  11. The next step is to create the .bak file.
    For this, right-click on the new DB and select Tasks -> Back Up… as shown below –


  12. Now, you will see the below screen.
    Remove the destination path that is pre-selected by clicking Remove as shown below.
    And then click on Add to select the path where you want to store your .bak file.


  13. After clicking on Add, you will see the screen below.
    Select the destination path/folder and add the desired File name. I have added TestDB12072019.


  14. Click OK and you will see it executing. Once 100% completed, you will see the following screen –


    Thats’s it! You have created SQL Server .bak file from Azure database .bacpac file.

    Now you can see the .bak file in the folder path you selected.


    Please leave a comment, if you have any questions.

Interested in Cryptocurrency. Register and start investing here

Earn a side income by affiliate marketing. Learn here how to do it.

How to access Load Balancer logs

AWS provides access logs for Elastic Load Balancers (ELB), allowing you to monitor and analyze traffic patterns. Below are general steps to access and view ELB access logs:

Amazon ELB Access Logs:

  1. Navigate to the EC2 Console:
    • Open the AWS EC2 Console.
  2. Select Load Balancers:
    • In the left navigation pane, choose “Load Balancers” under the “Load Balancing” section.
  3. Choose Your Load Balancer:
    • Click on the name of the load balancer for which you want to access logs.
  4. View Access Logs:
    • In the “Description” tab, look for the “Attributes” section.
    • Check if the “Access logs” attribute is set to “Enabled.”
  5. Access Logs Location:
    • If access logs are enabled, you can find them in an S3 bucket specified in the “S3 bucket” field.
  6. Navigate to S3 Bucket:
    • Open the AWS S3 Management Console.
    • Access the S3 bucket mentioned in the “S3 bucket” field.
  7. Access Log Files:
    • Inside the S3 bucket, you should find log files with a naming convention like <load-balancer-name>/<YYYY>/<MM>/<DD>/....
    • Download or view the log files to analyze the access logs.

AWS CLI:

You can also use the AWS Command-Line Interface (CLI) to access ELB access logs:

# Replace <your-load-balancer-name> and <your-s3-bucket-name> with your actual values

aws s3 cp s3://<your-s3-bucket-name>/<your-load-balancer-name>/<path-to-log-file> .

This command downloads the specified log file to the current directory.

Analyzing Access Logs:

Access logs typically include information such as client IP addresses, request timestamps, response status codes, and more. You can use tools like AWS Athena, Amazon CloudWatch Logs Insights, or other log analysis tools to query and visualize the logs.

Remember to adjust the steps based on the specific type of load balancer you are using (Application Load Balancer, Network Load Balancer, or Classic Load Balancer). Always refer to the official AWS documentation for the most accurate and up-to-date information.

These logs are much helpful if you are looking from which instance the request is coming.

Send Email with Attachment File from Lambda (Nodejs)

You can create a lambda (nodejs) with the following code (written in typescript) to send an email to a user with a file attachment.

In the below example, we are first getting the content from S3 bucket, then creating a csv and sending it to a user (SES verified user).

import {
    S3Client,
    GetObjectCommand
  } from "@aws-sdk/client-s3";
  import { SESClient, SendRawEmailCommand } from "@aws-sdk/client-ses";
  import { Readable } from "stream";
  const s3Client = new S3Client({ region: "ap-southeast-2" });
  const sesClient = new SESClient({ region: "ap-southeast-2" });


  export const sendEmail = async () => {
    const senderEmail = process.env.SENDER_EMAIL_ADDRESS;
    const recipientEmail: any = process.env.RECIEVER_EMAIL_ADRESS;
    const subject = "SUBJECT here";
    const bodyText =
      "Hello,\r\n\nPlease see the attached csv file \n\nThanks";
  
    const getObjectCommand = new GetObjectCommand({
      Bucket: process.env.BUCKET,
      Key: process.env.BUCKET_KEY,
    });
  
    const attachmentData = await s3Client.send(getObjectCommand);
    const attachmentBuffer = await streamToBuffer(
      attachmentData.Body as Readable
    );
  
    const attachmentBase64 = attachmentBuffer.toString("base64");
  
    const emailData =
      `From: ${senderEmail}\r\n` +
      `To: ${recipientEmail}\r\n` +
      `Subject: ${subject}\r\n` +
      `MIME-Version: 1.0\r\n` +
      `Content-Type: multipart/mixed; boundary="boundary"\r\n\r\n` +
      `--boundary\r\n` +
      `Content-Type: text/plain; charset=utf-8\r\n` +
      `${bodyText}\r\n\r\n` +
      `--boundary\r\n` +
      `Content-Type: application/octet-stream\r\n` +
      `Content-Disposition: attachment; filename="file.csv"\r\n` +
      `Content-Transfer-Encoding: base64\r\n\r\n` +
      `${attachmentBase64}\r\n\r\n` +
      `--boundary--`;
  
    const sendRawEmailCommand = new SendRawEmailCommand({
      RawMessage: {
        Data: Buffer.from(emailData),
      },
      Source: senderEmail,
      Destinations: [recipientEmail],
    });
  
    const result = await sesClient.send(sendRawEmailCommand);
    return result.MessageId;
  }

  async function streamToBuffer(stream: Readable): Promise<Buffer> {
    return new Promise((resolve, reject) => {
      const chunks: Uint8Array[] = [];
      stream.on("data", (chunk) => chunks.push(chunk));
      stream.on("end", () => resolve(Buffer.concat(chunks)));
      stream.on("error", reject);
    });
  }